In standard form, the Safari Condo Alto is in a class by itself: striking contemporary design, ultra-lightweight, and high quality construction. Fitting a full kitchen (sink/stove/fridge/microwave), bathroom with toilet and shower, queen size bed, two-person table and generous storage into a 17 ft trailer is certainly impressive. Add some compelling factory options and it is “glamping” in a compact package!
But when it comes to personal living spaces; whether it be a house, boat, or trailer, there is always room for improvement. In addition to the 1035W solar/600Ah battery system we had installed by Quality RV Solar, they made numerous other enhancements that have only added to our enjoyment of camping in our Alto.
Taking your wifi with you
Rosemary runs her own business, ToTheWeb LLC, and it’s important for her to stay connected. So Quality RV Solar installed a Cradlepoint IBR900 router and a low profile Panorama LGMM antenna that can pull in even weak cell signals. create a local WiFi network for mobile internet access. We pay Verizon $20/month for the SIM card in the router, providing 15Gb/month of bandwidth, but I wish we had more. Bizarrely, Verizon and AT&T do not offer plans with more bandwidth even if you set up a separate account as opposed to what we did which is add a SIM card to our existing account.
So while I’m driving towing the trailer Rosemary is doing work on her computer or iPad so that when we get to the campground she can relax!
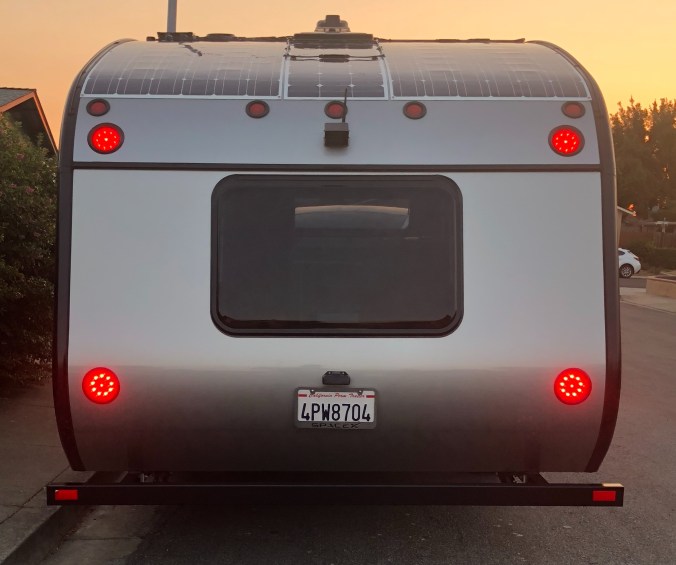
Additional taillights for safety
The stock Alto taillights are placed over six feet off the ground. That is a much higher position than drivers are used to seeing car taillights. They are also angled slightly upwards due to the curve of the roof. Because LEDs are directional, the taillights apparent brightness is diminished. When towing, my perception is that some drivers simply don’t see my turn signals during the day. I had Quality RV Solar install two more taillights (purchased direct from Safari Condo to match the existing taillights) about three feet off the ground. They are wired into the existing taillight circuit so that all four taillights work together.
The difference is dramatic; the added lower taillights appear more than twice as bright as the factory taillights because they are oriented vertically so they point directly to the rear. In real life the difference appears even greater than shown in this photo. In my opinion, these added taillights are in the optimal location for safety. (Dec 2018 update: I’ve heard indirectly that in the near future Safari Condo is going to change the Alto taillight position to where my added ones are placed.)

When viewed from inside, the taillights are just below the level of the bed, in an area that is generally used to store pillows and bedding. To protect the taillight wiring and prevent materials from snagging on them, plastic covers were fashioned and held to the wall with Velcro.

Ventilating the bathroom space
The Alto comes with a very effective ceiling vent fan, located in the center of the roof. But the small bathroom space not only lacks a window it also does not have its own fan. Not optimal, in my opinion. Quality RV Solar installed a Ventline Vanair 6.25” 12V ceiling fan, wired to the bathroom ceiling light, which greatly improves the ventilation. It has its own switch on the fan housing so with the ceiling light on the fan can be turned on and. The noise level is quite tolerable. A handle on the fan makes it easy to raise it to open it to the outside and pull it closed in case of rain. Definitely a worthwhile addition!

Added fan to the left of the factory ceiling light in the bathroom. Photo courtesy of Quality RV Solar.
More storage on the tongue
Removing the factory battery on the tongue — because the new solar system batteries were placed inside — resulted in space being available for a storage box. I bought a MaxxTow 2.27 cu ft box from trailer.com. In that location, very close to the hitch, it is proving extremely useful as a place to keep items related to hitching such as the caravan mover wheels. Also stored in the tongue box is a scissors jack for trailer tire changes, emergency reflectors, some tools, hitch ball grease, and gloves.
Taking the factory battery off the tongue reduced the weight on the tongue. Trailer tongue weight should be 10% to 15% of the gross trailer weight. To compensate, I had multiple 19 lb 0.25” thick steel plates cut to fit in the tongue box and use them to fine tune the tongue weight.


(Left) Storage box from the side, just forward of the front wall of the trailer. (Right) Storage box from the front, tiny propane tank (emergency use only, haven‘t used it yet!), electric tongue jack and caravan mover wheels in place. Photos courtesy of Quality RV Solar.
Letting electricity do the work
Like most trailers, the Alto comes standard with a manually-cranked tongue jack. But why not let electricity do that work? The photo above shows the Stromberg-Carlson 18” lift 2500 lb jack installed. In the world of trailer jacks, a 2500 lb jack is a lightweight, but then so is the Alto; it is more than adequate (and in fact I could not find a less powerful electric tongue jack). It comes with a hand crank in case the motor fails. The electric tongue jack makes hitching/unhitching a bit faster and easier.
Because we have so many “devices”
We need a lot of USB ports to charge them all; iPhones, iPads, Apple Watches, removable LED cabinet lights. Quality RV Solar added 8(!) 2.1A USB charge ports under the dinette table near the factory 120V and 12V outlets. That necessitated adding another fuse box.


(Left) 4 dual outlet USB ports. (Right) Added fuse box. Photos courtesy of Quality RV Solar
Night lighting convenience
At night in a dark campground, without a flashlight the step at the trailer door can be hard to see. This added LED light on the underside of the floor of the trailer below the door illuminates the step. It is controlled by an added switch just inside the door, and a dimmer control adjusts the intensity.


(Left) LED light above the door step. (Right) Control switches just inside the door. Photos courtesy of Quality RV Solar
Handling a hot campsite
The Alto trailer walls consist of two sheets of aluminum with a plastic honeycomb core, and the windows are double acrylic. So there is some insulation, but not a lot. In a hot environment the interior can get pretty warm. Some Alto owners use Aluminet shade cloth to reduce heat transmission into the trailer. We bought two pieces, one to cover the forward or aft wall, one for use on a side wall, had Keder cord sewn onto them and mounted additional Keder rails where needed to hang the shade cloth from. It does make a difference!

An easy way to add cabinet lighting
Even with the trailer’s interior lights on it can be difficult at night to see into the kitchen cabinets. We found an easy fix, these inexpensive LED rechargeable motion-sensing closet lights. First apply the included magnetic strip, then attach the light to it. When you open the cabinet door, the light comes on. When it stops sensing motion, like after the cabinet door is closed, the light turns off. Since they are LED they draw very little current, but they are quite bright. Recharge them as needed with the included mini-USB cable. Only one drawback; out of the 9 lights we bought, 4 of the magnetic strips separated from their adhesive backing. A bit of Super Glue solved that problem; not applied to the trailer but to the adhesive backing and magnetic strip.


And bringing up the rear…
Over the past four years we have become used to having the rear view camera image displayed continuously in our Tesla Model X; the wide angle view is very useful when going backwards and forwards. Of course when towing the view to the rear of the car is blocked. One solution is add-on side view mirrors, but I think a better solution is a rear view camera mounted on the back of the trailer and a display inside the car. I settled on this TadiBrothers wireless system (SKU97586) with a display that attaches to the car’s rear view mirror. The camera has a built-in transmitter that broadcasts a video signal that is picked up by a small receiver that I placed below the passenger seat. The receiver is connected to the display through a cable. I thought it made sense to use the car’s rear view mirror location for the rear view camera display, since when towing the car’s rear view mirror is useless; the trailer is in the way!
I was concerned that the wireless signal might have difficulty transmitting through the multiple layers of aluminum that would be between the camera and the receiver in the car, so I got the “Long Range Wireless (95 ft)” option, and to get the best possible image also got the “Upgrade camera to CCD (High Def)” option. I have had several times while towing where the rear view camera image disappears from the display for a second or two, but it’s a rare occurrence. The image isn’t as sharp as I hoped it would be but it is sufficiently clear to be usable.

While the system works well enough to be useful, I would not recommend this particular model. For some unknown reason, the image on the display in the car is upside down. The rear view camera on the trailer is definitely mounted correctly; it is not upside down! I contacted TadiBrothers support but they could not solve the problem and eventually just stopped responding to my emails.. There is no control to invert the image to correct the problem.
I did not want to return the unit because the camera was already mounted on the trailer and the hole that was drilled in the rear trailer wall for the 12V power wires to the camera was sealed with a waterproof material that would be very difficult to get off.
My solution was simple: invert the display that clipped on to the rear view mirror in the car. Then the rear view camera image was right side up. The touch controls on the display are upside down but I can still use them.
I’m happy to be able to have the trailer rear view camera image displayed in the car all the time when towing. But I hope there are better systems on the market than the one I bought.
Next: Towing with a Tesla

Thank for all the good information. Looks like you have done a terrific job making your RV the way you want it.
LikeLike
Pingback: Camping 100% electric = no propane | Electric Travels
How durable is the outside skin. Is it like an Air stream and easily dented?
LikeLike
Hi Cecil,
The Alto’s “skin” is aluminum like an Airstream, but it is double-walled with an insulating “honeycomb” structure between the two pieces. I have no idea how much force it takes to dent an Airstream so I can’t compared the two trailers in that regard. Of course it is possible to put a dent in an Alto if sufficient force is applied. After about 10,000 miles of travel with my Alto, the only dent I see is a very small one that occurred when a strong gust of wind flung the door up against the trailer wall.
So I don’t consider Alto trailer wall dents to be a serious issue. I have observed many Airstream trailers at campgrounds and have seen a lot of dents. Aluminum is certainly softer than steel, but obviously is a lot lighter. Still, Airstreams are very heavy for their size: an Airstream “Basecamp” trailer of about the same length as an Alto weighs about 75% more!
Barry
LikeLike